As the old saying goes….”You can never be too safe”…..! That’s certainly the motto I had in mind as I planned the safety of my chickens. In fact, every person I met or read about who had raised chickens also shared stories of losing part of their flock to some sort of predators. The most common were foxes, hawks, owls, and even the family dog! So…if you don’t feel comfortable with the high probability that this could eventually happen to your flock, then you might consider another path. However, if you plan accordingly, you can take several steps to possibly avoid the risks to your flock.
There are two primary times when your flock might be in danger of predators. First, and most commonly, during the evening hours; after the sun goes down at night and before the sun comes back up the next morning. And the second time is during the daylight hours. For my flock, I continually monitor the presence of evening predators such as neighborhood foxes, coyotes, stray cats, raccoons, rodents, and snakes. Daylight predators might include hawks, owls, family pets, humans (mostly kids playing in the backyard), and other hens within the same flock.
To protect my flock, I considered what I call the three protection zones.
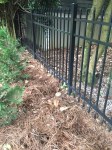
Outer Perimeter: The outer perimeter describes the initial obstacle or barrier that any potential predator might engage. Simply put, this is the fencing the surrounds the green space between my back yard and my in-laws back yard. (Side Note: My wife and I live directly behind my in-laws. Our back yards meet each other so we’ve taken down any fencing between the two yards to have a much larger, “combined” yard.) I was not very experienced in constructing fencing so we used a pretty cool online website called Thumbtack to post up a job and solicited for bids. We considered three bids and selected a contractor who met our design guidelines and budget. Some of those special considerations include:
a. Type of fencing material such as chain link, wooden, aluminum, wrought iron, etc. We decided on a combination of wooden picket fencing for one side of the green space, aluminum for another, and used a higher grade, temporary fencing material along one smaller stretch that would be eventually replaced by a permanent fence section by new neighbors.
b. Distance between fence slats. Our wooden picket slats are 4 inches wide with spacing in-between of approximately 1/2 inch. The spacing between the individual aluminum rails is approximately 2 inches. Keep in mind that you not only want to keep predators out, but you will want to keep your chickens “in” especially if your are free-ranging your flock. You don’t want a chicken to get stuck with its head between the pickets or rails or, worse yet, escape the backyard by squeezing through the fences.
c. Number of gates. Gates become access points for your backyard. Too many gates also leaves the likelihood that someone will leave a gate open! We kept our gates to simply four access points.
Once you establish the outer perimeter, you can continue to work inward and tackle the next protection zone: The Inner Perimeter
Inner Perimeter: The inner perimeter describes the second obstacle or barrier any potential predators might encounter. The inner perimeter has an increased amount of protection while covering a smaller area than the outer perimeter. We built a 25 feet by 6 feet by 6 feet chicken run made of sturdy 4×4 wooden posts and pressure treated 2×4 beams as the frame. The frame is further enclosed by a heavy 16-gauge animal fencing (ie. “chicken wire”) for the lower 3 feet sections of the side walls and a lighter, more traditional 18-gauge chicken wire for the upper 3 feet sections. Most predators are concerned with the poultry living area that’s 3 feet and below. I call this the “danger zone”. You can back off the thicker gauge of material on the upper 3 feet because its less likely that predators will attempt to penetrate that high off the ground. Again, I designed our chicken run by considering the probabilities. You can certainly design your chicken area with the heavier gauge all around, especially if budget and costs is not a factor. I also rolled a layer of the 18-gauge chicken wire on the flooring of the chicken run, securing it with u-shaped nails to the base of the structure. We covered the bottom of the chicken run with about 6 inches of pine bark mulch. Digging critters such as raccoons, weasels, and even snakes might attempt to tunnel beneath your structure from the outside, but the chicken wire flooring will more than likely deter them from coming up into the inside of your structure. And the mulch provides a softer flooring that doesn’t retain water for your flock. Lastly, I spread a very light, plastic fencing material across the top of the chicken run to prevent any raptors (owls, hawks, etc.) from swooping down into the structure from the air.
Now that we’ve addressed the outer and inner perimeters, let’s talk about the final protection zone: The Last Line of Defense!
Last Line of Defense: When all else fails, the last line of defense becomes the most impenetrable area for your flock from the threat of predators. It’s the smallest yet most secure area in your chickens’ livable space. When we inherited our flock of 5 hens, we also inherited their existing chicken coop; an area I affectionately call the “Hen House”. This 5 feet by 5 feet wooden structure has a peak that makes the hen house about 9 feet tall at the highest point. It also sits approximately 3 feet above the ground on stilts of sorts, with a heavy gauge of wire fencing around the lower level. The hens walk or fly up a ramp into the upper chamber for nesting, egg-laying and sleeping in the evenings. The ramp can be raised or lowered from a rope connected to a pulley system and secured on a cleat attached to the back side of the hen house. The sides of the upper chamber have windows with heavy gauge covering the openings. One side has an access point for egg collection near the two nesting boxes. The opposite side has a larger hinged door to open for the daily chore of cleaning out the inner living space.
One of the more amazing things about the poultry species is that they are very routine; meaning, when the sun starts going down, they head towards the ramp and up into the hen house. And when the sun comes up in the morning, they are ready to come back out (as evident by the noises they make in the morning….“Let us out of here!…”)
Depending on the time of year, I simply raise the ramp up in the evening after the chickens have made their daily climb into the hen house, making sure I securely tie off the rope on the metal cleat. Take a moment to count your chickens to ensure they are all “present and accounted for” before securing up the ramp for the evening. I also tie off the rope even when the ramp is down during the day so the chickens don’t get their legs or wings caught up in a rope that is dangling around with too much slack. True story….I recently found one of our smaller, bantam hens hanging upside down by one of her legs when we forgot to remove any slack in the rope while the ramp was down! She got tangled up while trying to fly up the ramp. Luckily she was fine, although a little shaken up!
I mentioned a lower chamber to the hen house earlier. There is a small access door that must also be closed up when putting the hens to bed at night. For all the doors and hinged portals to the entire livable space, I have metal hasps that I secure with snap-link systems. The hens are fairly well “buttoned-up” at night in this final protection zone. I feel fairly confident that if a predator were able to penetrate the outer and inner perimeters, they might have challenges getting access into the upper chamber that serves as the final protective area for the hens.
Final Thoughts: Even though your protection zones are complete, you should continue to inspect them periodically. Walk the fence line of your outer perimeter for signs of holes or tunneling. Inspect the inner perimeter for any signs of torn fencing, pulled out u-shaped nails, as well as tunneling from the bottom sides of the walls. And inspect your last line of defense for similar signs of damage or disruption. I keep a cache of materials in case I need to make any quick repairs, since damage to your protection zones can occur at any time of the day.
If you want to get super high-tech, you can looking into other protective measures such as security cameras or electric fencing. Run a Google search if you’re interested in these options as there is a wealth of information available on those ideas too.
Finally, while these steps fit for my particular scenario as an “urban” chicken farmer in Charlotte, I’d certainly recommend adjusting the design of your zones depending on your geography, size of the flock, and predators native to your area. Again, no chicken coop is completely impenetrable but if you take some steps as I’ve outlined here, you can decrease the risks to your flock.


You made an A+ on this one too!! You explained it perfectly. Such good information you are sharing….thank you.
Janet
LikeLike